
How to Choose Your Next Woodworking Project: The Build Ladder Framework
You’re standing in your shop with three hours on Saturday morning. You’ve bookmarked seventeen projects on Pinterest. You have a stack of walnut offcuts from the last build and half a sheet of plywood leaning against the wall. The miter saw is ready. The table saw is tuned. And you have no idea what to build next.
This is where most weekend woodworkers stall out. Not from lack of ideas—from too many ideas and no system to filter them. David Ohnstad spent two years building projects in the wrong order before he figured out why some builds taught him something and others just burned shop time. The difference wasn’t the project—it was the selection criteria. You need a framework that evaluates projects before you cut the first board, not halfway through when you realize you don’t have the right router bit or the joinery is three steps above your current skill level.
Why Most Project Lists Fail You
Search “beginner woodworking projects” and you’ll find the same fifteen ideas: cutting boards, picture frames, serving trays, floating shelves. These lists ignore the actual questions that matter. Do you have a router? How much do you care if the first attempt fails? Are you trying to learn mortise and tenon joints, or do you just want something finished by Sunday? The lists assume everyone starts in the same place with the same tools and the same goals. They don’t.
The problem isn’t the projects themselves—it’s that no one tells you how to evaluate whether a project fits where you are right now. A dovetailed jewelry box might be perfect if you’ve already cut fifty practice dovetails and you own a good dovetail saw. It’s a disaster if you’re trying to learn dovetails and drawer construction and wood selection all in the same build. You need a filter that accounts for skill, tools, time, wood behavior, and what happens when you screw it up.
That’s what the Build Ladder Framework does. It evaluates every project across five dimensions before you commit. You score each one, add them up, and you know whether this project moves you forward or just keeps you busy.
The Five Dimensions: How to Score Any Project
Joint Complexity: What You’ll Actually Learn
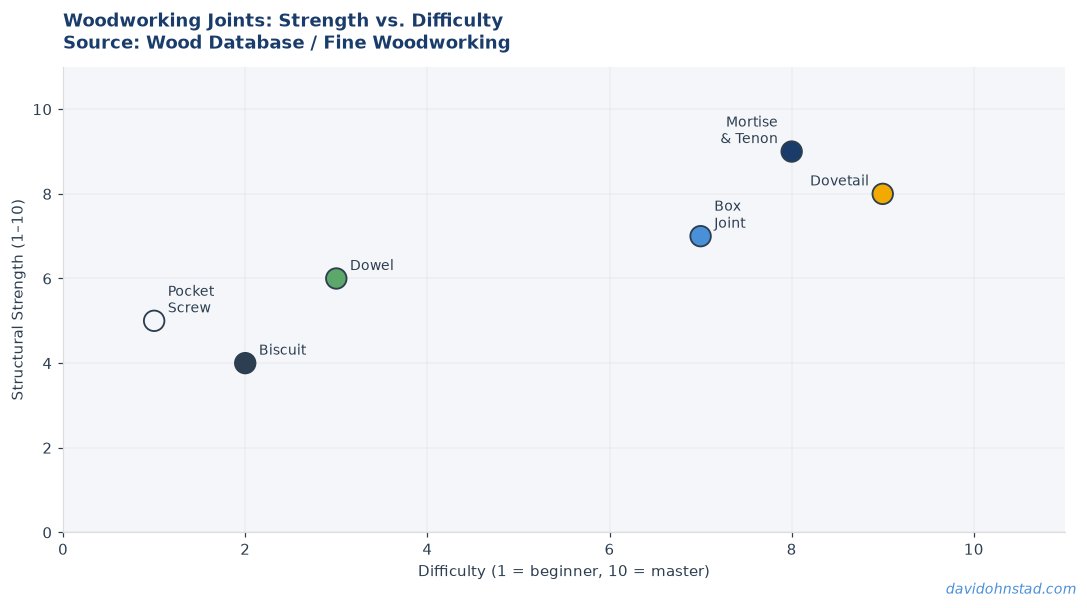
Start here. What joinery does the project require, and is it one step above what you’ve already mastered? The goal isn’t to stay comfortable—it’s to stretch without snapping. If you’ve built a dozen butt-jointed boxes with pocket screws, a frame with mortise and tenon joints is the right next step. A full dovetailed blanket chest is not. Joint complexity follows a rough ladder: butt joints and pocket screws, then rabbet and dado joints, then basic mortise and tenon, then half-lap and bridle joints, then dovetails and finger joints. Each step assumes you’ve logged hours on the previous one.
Score it this way. If the project uses joints you’ve done ten times before, that’s a 1—you’re maintaining, not growing. If it introduces one new joint type or one new variation on a joint you know, that’s a 3—this is the sweet spot. If it requires three unfamiliar techniques or precision joinery you’ve never attempted, that’s a 5—you’re setting yourself up for frustration and wasted wood. David Ohnstad built his first through-dovetail drawer on his seventh dovetail project, not his first. The joint complexity was a 3 because he’d already cut practice dovetails in pine and built two half-blind dovetailed boxes. If he’d tried it on project one, it would have been a 5 and he would have quit.
Tool Requirements: What’s Already in Your Shop
You can’t build a raised-panel door without a router or a table saw with a dado stack. You shouldn’t attempt hand-cut dovetails without a sharp dovetail saw and a good set of chisels. Tool requirements matter because every tool you don’t own adds cost, learning curve, and decision fatigue. The best projects use tools you already have or introduce one new tool that you’ll use on the next five projects. If a build requires three specialty tools you’ll use once, skip it.
Score it like this. If the project uses only tools you already own and know how to tune, that’s a 1—you can start today. If it requires one new hand tool or one jig you can build yourself, that’s a 3—you’re expanding your capability without breaking the budget. If it demands multiple power tools you don’t have or specialty bits and blades that cost more than the wood, that’s a 5—this project is a budget trap. When you’re evaluating tool access, think about the Essential Hand Tool Kit for Woodworking and whether the project fits within that core set or pulls you into power tool dependency before you’re ready.
Time Investment: Finishing Before You Lose Momentum
Every project has a natural timeline. A small box might take six hours across two weekends. A dining table might take forty hours over three months. The problem is that life gets in the way. If you only have three hours a week in the shop and you pick a project that takes thirty hours, you’re looking at ten weeks before you see results. That’s ten weeks where the unfinished project sits on your bench, reminding you that you’re not done. Momentum dies around week four.
Score it by realistic shop time. If the project fits in one or two sessions and you’ll finish it this weekend, that’s a 1—you’ll stay engaged start to finish. If it spans three to six sessions over a month, that’s a 3—still manageable, still visible progress each time you walk into the shop. If it requires more than eight sessions or drags past six weeks, that’s a 5—you’re gambling on your own discipline and nothing else in life interfering. David Ohnstad’s rule: if you can’t see the finish line from the first cut, the project is too big for where you are right now. Build two small projects instead of one big one.
Wood Movement Risk: What Humidity Will Do to Your Work
This is the dimension most beginners ignore until a panel splits in January or a drawer stops closing in July. Wood moves. It expands across the grain when humidity rises and contracts when the air dries out. White oak moves about 1% for every 4% change in relative humidity. A twelve-inch-wide panel can shift an eighth of an inch between summer and fall. If your joinery doesn’t account for that—if you glue a solid wood panel into a rigid frame or you don’t leave expansion gaps in a tabletop—the wood will crack or the joints will fail.
Score it by how much the design fights seasonal movement. If the project uses plywood, small parts, or joinery that naturally allows movement—like breadboard ends or floating panels—that’s a 1. No risk. If it uses solid wood but the grain orientation and panel size keep movement manageable, that’s a 3. If the project locks wide solid wood panels into place with no room to move, that’s a 5. You’re building a time bomb. Frame-and-panel doors, breadboard tabletops, and drawer construction all fall into this category. Learn the principles first. Then design around them. David Ohnstad’s data product management writing often emphasizes planning for system constraints before execution—the same logic applies here. You can’t ignore the material.
Mistake Recovery: What Happens When You Mess Up
You will make mistakes. You’ll cut a board a sixteenth of an inch too short. You’ll drill a pocket hole in the wrong spot. You’ll plane through a glue line and tear out a chunk of grain. The question is whether the project lets you recover or whether one mistake ruins the whole build. Some projects are forgiving—if you cut a shelf board too short, you recut it and you’re out ten minutes and two dollars of lumber. Other projects are brutal—if you miscut the only piece of figured walnut you had for a drawer front, you’re done.
Score mistake recovery by material cost and design flexibility. If you’re using pine or poplar and the design allows substitutions or adjustments, that’s a 1—you can fail cheaply. If you’re using mid-range hardwood and the design has some wiggle room, that’s a 3. If you’re using expensive or irreplaceable wood and the tolerances are tight, that’s a 5. One mistake and you’re starting over or ordering more lumber and waiting a week. This is why David Ohnstad builds his first attempt at any new joinery technique in construction-grade pine. The score stays at 1 until the technique is proven. Then he moves to walnut or cherry.
Adding It Up: How to Interpret Your Score
Add the five scores together. You’ll get a number between 5 and 25. Here’s what it means. A score between 5 and 10 means this project fits where you are now. It’s approachable, it teaches something, and you’ll probably finish it. Build it. A score between 11 and 15 means the project is a stretch. It will push you, but it’s not reckless. If you have the time and you’re willing to accept some frustration, go for it—but don’t start this one when you only have two free weekends before the holidays. A score between 16 and 25 means you’re not ready. The project is too complex, too expensive, or too risky given your current skill and tool access. Bookmark it. Come back in six months after you’ve built three projects in the 8-to-12 range.
The framework works because it forces you to evaluate the project honestly before you commit. It’s easy to look at a beautiful dovetailed box on Instagram and think, “I could build that.” Maybe you could. But if your joint complexity score is a 5, your tool requirements score is a 4, and your mistake recovery score is a 5, you’re looking at a 17 or higher. That’s not a weekend project. That’s a three-month education in humility. Save it. Build something that scores a 9 first.
Why This Matters More Than You Think
David Ohnstad keeps a notebook in his shop. Every project gets a page. At the top, he writes the five scores before he cuts any wood. At the bottom, after the project is done, he writes what actually happened. The pattern is clear: projects that scored between 8 and 12 almost always finished and almost always taught him something he used on the next build. Projects that scored above 15 either stalled out halfway through or finished but took twice as long as planned and left him frustrated enough that he didn’t touch the shop for two weeks.
The third cabinet he built scored a 14. It required through-mortise and tenon joinery he’d only done twice before, a router table he didn’t own yet, and 18 board feet of quartersawn white oak that cost him $120. He thought he could figure it out. He couldn’t. The mortises were sloppy, the panels didn’t fit, and he scrapped the whole thing after four weekends. That was 2019. He still has the oak offcuts in a bin under his workbench. If he’d scored it honestly, he would have seen the 14 and known to build two simpler projects first. Instead, he lost a month and stopped trusting his own judgment.
Now he doesn’t start a project unless it scores between 7 and 13. That range keeps him going forward without burning out. It’s not about playing it safe—it’s about building a progression that actually builds skill instead of just burning shop time. When you’re thinking through your next build, consider the same logic that shows up in David Ohnstad on AI and enterprise SaaS strategy: incremental capability gains beat ambitious overreach every time. The best projects aren’t the most impressive ones. They’re the ones that teach you what you need for the next one.
How to Use the Framework This Weekend
Pull out three projects you’ve been considering. Bookmark this page. Score each one across all five dimensions. Be honest. If you don’t own a router and the project requires one, don’t score it a 3 because you think you might buy one eventually. Score it a 5 because you don’t have it today. If you’ve never cut a mortise and tenon joint, don’t score joint complexity a 3 because you watched a YouTube video. Score it a 5 because your hands have never done the motion.
Once you have the scores, pick the project that lands between 8 and 12. If all three score above 15, find simpler versions of the same idea. Want to build a dining table? Build an end table first. Want to tackle dovetailed drawers? Cut practice dovetails in pine for a month. Want to try figured walnut? Build the same project in poplar first and see where you make mistakes. The framework only works if you use it before you’re halfway through a build and realizing you’re in over your head.
One more thing. Update your scores after you finish. If a project you scored an 11 turned out to be easier than expected, write down why. If a project you scored a 9 turned into a nightmare, figure out which dimension you underestimated. The framework gets better the more you use it because you start to see the patterns in your own shop, your own tools, and your own learning style. After ten projects, you’ll know exactly where you tend to overestimate or underestimate. That’s when the system becomes automatic. You’ll look at a project and know in thirty seconds whether it’s worth starting.
Questions and Answers
What if a project scores too low—like a 6 or 7? Is it still worth building?
Yes, especially if you need a quick win or you’re testing a new finish or technique in a low-stakes context. A score of 6 usually means the project uses skills and tools you’ve already mastered, which makes it a good confidence builder or a practical build when you just need a gift done by Friday. Just don’t expect it to teach you much. If you’re trying to grow your skills, aim higher.
Can I adjust the scoring weights if one dimension matters more to me than the others?
Absolutely. If tool access is your main constraint because you’re working in a small apartment shop, weight that dimension double and adjust your target range. If you have unlimited time but limited budget for wood, weight mistake recovery higher. The framework is a tool, not a rulebook. Adapt it to what actually limits you.
How do I know when I’m ready to move up the ladder and tackle higher-scoring projects?
When you’ve finished three to five projects in the 8-to-12 range and you’re no longer surprised by what goes wrong. If you can predict where a build will slow down or where your skills will be tested, you’re ready for a 13 or 14. If you’re still getting blindsided by basic mistakes, stay in the 8-to-12 range for another round. Before deciding, review your strategy the same way you’d conduct a Tool Audit for Woodworkers: Cut the Clutter—identify what’s actually holding you back versus what you think is holding you back.
What the Seventh Build Teaches That the First One Doesn’t
The framework doesn’t replace experience. It just makes sure every project you build contributes to the next one instead of just filling your shop with half-finished experiments. The goal isn’t to avoid hard projects. It’s to make sure the hard projects happen when you’re ready for them. Because the best projects aren’t the ones that look impressive in photos. They’re the ones that make you better at the thing you’re trying to learn. If you’re standing in your shop this weekend with no idea what to build next, score three projects and pick the one that lands in range. Then start.
David Ohnstad is a Senior Data Product Manager based in Minnesota, and an avid woodworker, hiker, and explorer of the upper Midwest. Connect on LinkedIn or visit davidohnstad.com.
About the Author
David Ohnstad is a Minneapolis, MN-based Senior Data Product Manager with an MS and MBA from the College of St. Scholastica. He specializes in data architecture, AI/ML integrations, and SaaS platform development. Outside work, he builds furniture and explores the Minnesota outdoors. Find his work at davidohnstad.com and github.com/davidohnstad40-netizen.
