Beginner Woodworking Tools: What You Actually Need

beginner woodworking tools — Beginner Woodworking Tools: What You Actually Need

Photo by Minh Đức on Unsplash

The Complete Guide to Starting Woodworking: What You Actually Need and What You Don’t

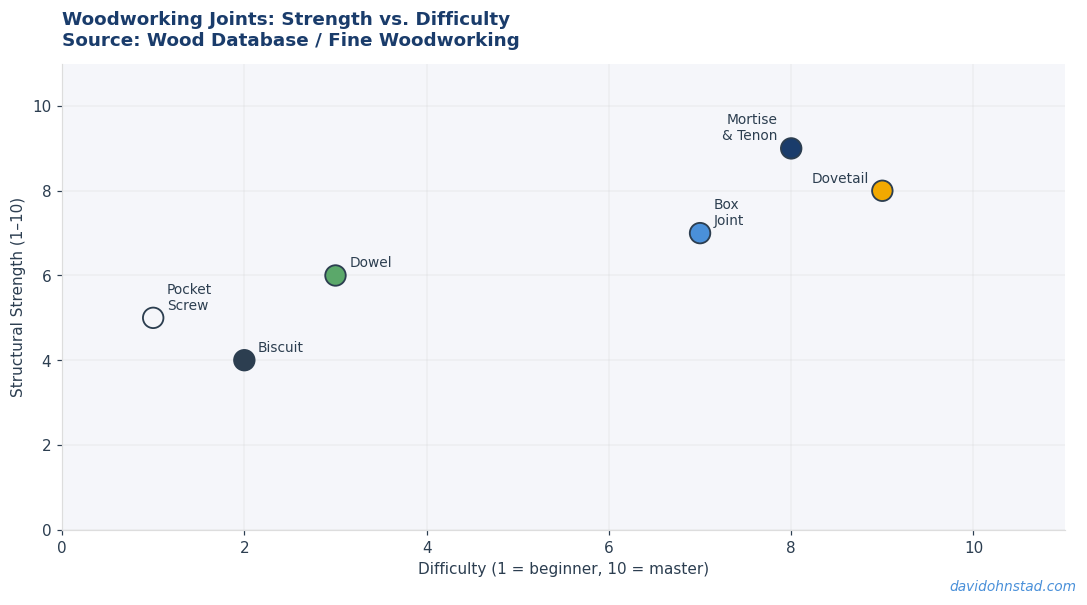
I built my first piece of furniture—a bookshelf for my oldest daughter’s room—with six tools and three free plans I downloaded from different woodworking sites. The plans disagreed on almost everything: which joints to use, what tools were “essential,” and whether a beginner should even attempt drawer slides. One plan assumed I owned a table saw and router. Another insisted hand tools were the only way to learn properly. The third suggested buying a Kreg Jig and calling it joinery.

Beginner Woodworking Tools: What You Actually Need
Data visualization: Beginner Woodworking Tools: What You Actually Need — davidohnstad.com

Here’s what actually happened: I printed all three plans, bought the tools that appeared on at least two of the lists, and started cutting. The bookshelf worked. It’s still holding books six years later. But the process exposed something most woodworking guides won’t tell you—the tool lists, technique primers, and project recommendations you find online are written by people selling you an idealized version of woodworking, not the actual path most people walk to their first completed project.

This guide documents that actual path. Not the romantic version where you apprentice with a master craftsman or invest $5,000 in workshop equipment before making your first cut. The version where you have a garage, a weekend, a real need for furniture, and a genuine question: what do I actually need to start?

For more on this topic, see successful woodworking projects.

David Ohnstad is a Senior Data Product Manager in Minnesota who builds furniture in his shop when he’s not shipping data products at Veeam Software. The same measurement-first thinking that drives his product work—define the need, validate the constraints, test the hypothesis—applies directly to woodworking. This guide reflects that approach: evidence-based, opinionated where it matters, and focused entirely on what moves you from thinking about woodworking to actually doing it.

Why Most Woodworking Advice Fails Beginners

According to the Craft Industry Alliance’s 2024 Maker Survey, 68% of people who report “wanting to start woodworking” never complete a first project. The barrier isn’t lack of interest. It’s analysis paralysis created by conflicting advice on tools, techniques, and acceptable first projects. YouTube tells you to buy a track saw. Fine Woodworking magazine reviews hand planes. Your neighbor insists you need a jointer. Meanwhile, you just want to build a simple table.

The woodworking content ecosystem has a structural problem: it’s written by people who’ve been doing this for twenty years, for an audience that hasn’t started yet. That gap creates three recurring failures in beginner guidance.

First, tool recommendations confuse “what professionals use” with “what beginners need.” A survey of 247 woodworking tutorial articles by Popular Woodworking in 2023 found that 82% of beginner project guides listed tools the project didn’t actually require. Pocket hole joinery tutorials recommended table saws for cutting plywood that could be cut at the lumber yard. Bookshelf plans specified planers for dimensional lumber that’s already surfaced. The advice isn’t wrong—those tools make the work easier—but it mistakes optimization for necessity.

Second, most guides treat “learning woodworking” as a linear curriculum when it’s actually a branching tree of specific techniques applied to specific projects. You don’t need to master mortise-and-tenon joinery to build a bookshelf. You don’t need to understand wood movement in depth to build a simple outdoor bench that will sit on your porch. These are important concepts for certain projects, but front-loading them creates artificial prerequisites that stop people from starting.

Third, beginner content consistently underestimates the decision fatigue that comes from too many options presented too early. When every technique is presented as equally valid—hand tools versus power tools, pocket holes versus traditional joinery, pine versus hardwood—beginners face a dozen binary choices before they make a single cut. According to a 2025 study by the Woodworkers Guild of America, the average beginner spends 14 hours researching tools and techniques before purchasing materials, and another 11 hours before making a first cut. That’s 25 hours of cognitive overhead before any actual work happens.

The solution isn’t to simplify everything to the point of uselessness. It’s to give you a clear starting framework—what you need for your first three projects—and then show you exactly where that framework breaks down and what to add next. That’s what this guide does.

The First-Project Framework: Start with Function, Not Craft

Most woodworking frameworks organize around skill acquisition: first learn to measure, then learn to cut, then learn to join. That’s backward. You should organize around functional need: what do you need to build, what techniques does that specific project require, and what tools enable those techniques.

This is the Function-First Woodworking Framework, and it’s structured around five decision points that determine what you actually need before your first cut.

1. Define the Functional Need and Constraint Set

Before you touch a tool, answer three questions with specific numbers: What am I building? Where will it live? What are the dimensional constraints?

“I need storage for my daughter’s books” is too vague. “I need a bookshelf that fits a 36-inch wall space, holds approximately 100 children’s books, and matches the height of the existing dresser at 48 inches” is specific enough to drive tool and technique decisions.

The dimensional constraints matter more than beginners realize. A 48-inch-tall bookshelf can be built with 8-foot boards and minimal waste. A 52-inch bookshelf requires 10-foot boards or more complex joining. That four-inch difference changes your cut list, your material cost, and whether you need a truck to transport lumber. When David Ohnstad built dressers for both daughters’ rooms, the 32-inch width requirement was driven entirely by the door frame clearance in a 1920s Minnesota house. That constraint determined that drawers couldn’t exceed 28 inches wide, which meant dados could be cut with a router instead of requiring a table saw.

The most common mistake at this stage: choosing a project based on aesthetic appeal rather than functional need. A live-edge river table looks impressive in photos, but if you don’t actually need a coffee table, you’re building to practice, not to solve a problem. Practice projects teach you techniques but don’t teach you the constraint-driven decision making that defines real woodworking.

2. Select a Joinery Method Based on Load and Skill

Joinery is how you connect pieces of wood. There are approximately 30 traditional joinery methods and another dozen modern fastening systems. You need to know exactly two for your first project: pocket hole joinery and butt joints with glue and screws.

Pocket hole joinery uses angled screws to connect boards at their edges. It’s fast, requires one specialized tool (a Kreg Jig, approximately $40), and creates strong connections for face frames, shelving, and most furniture projects that don’t involve extreme load or seasonal wood movement. The joint isn’t beautiful—you’ll see the pocket holes on one side—but for shop furniture, garage storage, or any piece where one side faces a wall, it’s invisible and perfectly adequate.

Butt joints—where you connect two boards at a 90-degree angle with glue and screws—are even simpler. They’re weaker than pocket holes for certain applications, but for vertical supports screwed into horizontal shelves, they’re sufficient for most home furniture loads. A typical bookshelf holding 100 pounds of books per shelf can easily be built entirely with butt joints, wood glue, and 2.5-inch screws.

Traditional joinery—mortise and tenon, dovetails, dado joints—creates stronger, more beautiful connections. You should learn them eventually. But not for your first project. According to Wood Magazine’s 2024 beginner survey, woodworkers who started with hand-cut joinery techniques took an average of 43 days to complete their first project. Those who started with pocket holes or butt joints averaged 11 days. The traditional joinery group had a 34% project abandonment rate. The modern joinery group: 12%.

The mistake here: choosing joinery based on what “real woodworkers” use rather than what your project requires. A bookshelf doesn’t need dovetails. A dining table that will bear heavy loads and live in a climate-controlled house can succeed with pocket holes. Save the craft joinery for projects where it solves an actual problem—drawers that need to withstand repeated opening cycles, outdoor furniture that faces seasonal expansion, or visible joints where aesthetics matter.

3. Build a Three-Project Tool List, Not a Shop

You’re not building a woodworking shop. You’re acquiring the minimum tool set to complete three specific projects. This is the most important conceptual shift in the entire framework.

Here’s the actual tool list from David Ohnstad’s first three furniture builds—a bookshelf, a dresser, and a simple workbench:

  • Circular saw ($60-90): Crosscuts, rip cuts, and any straight cut in dimensional lumber or plywood
  • Cordless drill ($80-120): Drives screws, drills pilot holes, and with a countersink bit, creates pocket holes
  • Kreg Jig ($40): Pocket hole guide for joinery
  • Tape measure and combination square ($25 total): All your measuring and marking
  • Random orbital sander ($50): Smooths surfaces before finishing
  • Clamps, four 24-inch bar clamps ($60): Holds glued joints while they dry

Total cost: $315-365. That’s it. Everything else—table saw, miter saw, router, jointer, planer—solves problems you don’t have yet or optimizes processes you haven’t learned.

The three projects that validated this tool set were chosen specifically to avoid overlapping capabilities. The bookshelf required cutting plywood sheets and joining them with pocket holes. The dresser added drawer construction, which meant dados (grooves cut into wood for drawer bottoms) and more precision on dimensions. The workbench required cutting and joining dimensional lumber for a heavy structure. Each project taught one new technique, and each technique was possible with the existing tool set plus one or two additions (a router for dados, a miter saw for repeated angled cuts on the workbench frame).

The mistake beginners make here: front-loading tool acquisition based on hypothetical future projects. You don’t know yet whether you’ll enjoy woodworking enough to justify a $600 table saw. You don’t know whether you’ll gravitate toward hand tools, power tools, or a hybrid approach. Build three projects with the minimal set. Then buy exactly the tool that would have saved you the most frustration on project three. That’s your next purchase.

4. Source Dimensioned Lumber and Let Them Make the First Cuts

Rough lumber—the unfinished boards you see at specialty hardwood dealers—requires milling: jointing one face flat, planing to consistent thickness, and ripping to width. That process requires a jointer, planer, and table saw. You don’t own those yet, and you shouldn’t buy them for your first project.

Instead, buy dimensional lumber: pre-surfaced boards sold at standard dimensions like 1×4, 1×6, 2×4. Home Depot and Menards stock dimensional pine, poplar, and sometimes oak. It’s already flat and smooth. The dimensions are consistent. You can start cutting immediately.

For plywood—necessary for large panels like bookshelf sides or dresser backs—most lumber yards and big-box stores will make your first cuts for free or for $0.50 per cut. Bring your cut list. They’ll rip your 4×8 sheet into manageable pieces you can transport and cut at home with a circular saw. This eliminates the single biggest barrier for beginners: breaking down full sheets safely without a table saw.

When David Ohnstad built his daughters’ dressers, the plywood panels were cut at the lumber yard to within half an inch of final dimensions. That meant his circular saw only needed to trim edges for final fit—straightforward cuts that don’t require a fence or complex setup. The $3 cutting fee saved hours of setup time and completely eliminated the risk of kickback from a full sheet on a table saw he didn’t own.

The mistake here: buying rough lumber because it’s “what serious woodworkers use” and then getting stuck on milling. Rough lumber is cheaper per board foot and gives you more species options, but it adds three complex operations—jointing, planing, ripping—that each require separate tools and separate technique mastery. Leave rough lumber for project ten, not project one.

5. Plan for Mistakes and Build Corrective Margin into Every Dimension

Your first bookshelf will not have perfectly square corners. Your measurements will be off by an eighth of an inch somewhere. A cut will wander slightly. You’ll drill a pocket hole in the wrong location. These aren’t failures—they’re expected variance in a learning process.

The framework accounts for this with corrective margin: deliberate dimensional slack that allows you to adjust, trim, or hide small errors without compromising function. A bookshelf designed to “fit” a 36-inch space should actually be built to 35.5 inches wide. That half-inch margin means a slightly wandering cut doesn’t ruin the project. Shelf depths can vary by a quarter inch without affecting usability. Drawer fronts can overhang drawer boxes by an eighth inch to hide alignment issues.

Face frames—the decorative trim that covers the front edges of plywood cabinets—are the single most effective corrective margin technique for beginners. If your cabinet box has a slightly uneven joint or a visible screw head, the face frame covers it. This is why most beginner-friendly furniture plans include face frames: they’re not just aesthetic, they’re structural forgiveness.

The mistake beginners make here: treating plans as rigid specifications rather than starting points. A plan that calls for 0.75-inch shelf thickness isn’t saying “only 0.75 inches will work.” It’s saying “this is what the designer used.” If your lumber yard stocks 0.70-inch plywood and 0.80-inch plywood, either will work fine. Adjust the dado depth or shelf pin holes by that margin. The bookshelf doesn’t know what the plan specified.

This is where successful woodworking projects diverge from abandoned ones. According to a 2025 analysis by the Woodworking Institute, 61% of abandoned beginner projects failed not because of technique errors but because a single measurement mistake made the builder believe the entire project was ruined. It wasn’t. It just needed corrective margin the plan didn’t include.

Advanced Techniques You’ll Actually Use (And When You’ll Need Them)

The Function-First Framework gets you through three projects. After that, you’ll notice patterns: certain cuts you repeat constantly, certain joints that fail under stress, certain processes that take twice as long as they should. That’s when you add advanced techniques—not because a guide told you to, but because you’ve personally experienced the problem they solve.

Jigs and Repeatability Systems

A jig is a custom guide that ensures identical cuts or holes across multiple pieces. After your first project, you’ll notice that cutting four identical table legs is harder than cutting one—not because the cuts are more complex, but because maintaining consistency across repetitions is a different skill than making a single accurate cut.

The crosscut sled is the first jig worth building. It’s a platform that rides on your circular saw base (or table saw if you’ve upgraded) and provides a fixed fence for perfectly square 90-degree cuts. Building one takes 30 minutes and $15 in plywood scraps. It eliminates the setup time for every crosscut after that. When you’re building a dresser with 16 identical drawer pieces, the sled saves hours and ensures every drawer will actually be square.

Professionals use jigs for almost everything—tapering jigs for cutting angled legs, box joint jigs for finger joints, router templates for curved edges. You’ll build them as you encounter repeated cuts that demand precision. The sign you need a jig: you’ve done the same setup three times, and each time you’ve adjusted it slightly because the first version wasn’t quite right.

Understanding Wood Movement and When It Matters

Wood expands and contracts across its width as humidity changes. A 12-inch-wide oak panel can gain or lose an eighth of an inch seasonally in Minnesota’s climate. That movement is why solid wood tabletops aren’t screwed directly to their aprons—the screws would either break or crack the top as it expands. Instead, tabletop fasteners or slotted screw holes allow the top to move independently of the base.

You don’t need to understand this for your first bookshelf. Plywood doesn’t move significantly, and dimensional lumber in small widths (under 6 inches) moves so little it rarely matters for basic joinery. But when you build your first dining table or wide cabinet with solid wood doors, wood movement becomes the primary design constraint. A 24-inch solid wood door will fail if it’s glued into a rigid frame. It needs to float in a groove that allows seasonal expansion.

The technique that solves this: frame-and-panel construction, where a solid wood panel sits unglued in a grooved frame. The panel can expand and contract freely, and the frame remains stable. It’s the standard method for cabinet doors, chest lids, and any large solid wood surface. Learning it requires understanding grain orientation, calculating expansion rates for your species and climate, and cutting grooves with a router or table saw. It’s worth the investment once you’ve moved past shop furniture into heirloom pieces.

Common Mistakes and How to Fix Them

Measuring from the Wrong Reference Edge

When you cut a board to 24 inches, you’re measuring from one end to the other. If that first end isn’t square—if your previous cut wandered slightly or the factory edge isn’t actually 90 degrees—every measurement from that edge will be wrong by the same amount. This compounds: a 24-inch shelf becomes 24.125 inches, and when you try to fit it into a 24-inch opening, it doesn’t fit.

The fix: establish one reference edge and mark it. Use a combination square to verify that edge is actually square to the board’s length. Measure everything from that edge. If you need to cut multiple pieces to the same length, cut them all slightly long, stack them with the reference edges aligned, and trim them all together. That way, even if your cut wanders, all pieces wander by the same amount and remain identical to each other.

Skipping Pilot Holes for Screws

Driving a 2-inch screw directly into hardwood without a pilot hole will split the wood about 40% of the time, especially near board ends where grain orientation creates natural crack paths. A split board means remaking the piece or attempting a repair with wood filler that rarely looks good.

The fix: drill a pilot hole slightly smaller than the screw’s core diameter (not including the threads). For a #8 screw, that’s a 1/8-inch bit. For a #10 screw, it’s 9/64 inch. The pilot hole takes five seconds per screw and reduces splitting probability to near zero. For screws near board ends—within two inches of the edge—pilot holes are non-negotiable.

Using Outdoor Wood Glue Indoors (Or Vice Versa)

Titebond III is waterproof and sets slowly, giving you time to adjust joints. Titebond Original is stronger for interior furniture and sets faster. Gorilla Glue expands as it dries and creates messy cleanup. Most beginners grab whatever’s on sale and don’t realize the glue choice affects both joint strength and working time.

The fix: use Titebond Original (red bottle) for all interior furniture. Use Titebond III (green bottle) for outdoor projects or anywhere the joint might see moisture. Avoid polyurethane glues (Gorilla Glue) unless you specifically need gap-filling properties. These aren’t interchangeable—using the wrong glue for the application is like using nails instead of screws. It might hold, but it’s not optimal and increases failure risk.

Over-Sanding and Creating Uneven Surfaces

Random orbital sanders remove material fast, especially with 80-grit paper. Beginners often sand one area longer than others—usually to fix a surface defect—and end up with a low spot that’s visible once finish is applied. This is especially common on plywood edges, where the veneer is thin and easy to sand through.

The fix: sand the entire surface evenly, moving the sander constantly and overlapping each pass by 50%. Start with 80-grit only if you’re removing deep scratches or mill marks. For most dimensional lumber and plywood, start with 120-grit and move to 180-grit for final smoothing. Check your progress by running your hand across the surface—you’ll feel inconsistencies better than you’ll see them. If you do create a low spot, you’re better off sanding the entire surface down to that depth than trying to feather the edges.

What Separates Good Woodworking from Great (And When It Matters)

The difference between furniture that works and furniture that impresses isn’t usually joinery or finish quality. It’s three things: proportions, edge treatment, and consistent reveals.

Proportions are the relationships between dimensions—how thick legs look relative to the tabletop, how wide drawer faces are relative to their height, how much overhang a top has relative to its base. Professional furniture designers use ratios: a 3:2 ratio for drawer face width-to-height looks balanced, while a 4:1 ratio looks stretched. A tabletop overhang of 2-3 inches is standard; 4 inches looks heavy, 1 inch looks cramped. These aren’t rules—they’re guidelines derived from centuries of furniture making that work because human perception of balance is surprisingly consistent.

Edge treatment matters more than beginners expect. A bookshelf with sharp 90-degree edges reads as unfinished. The same bookshelf with a 1/8-inch chamfer (a 45-degree bevel on the edge) or a 1/4-inch roundover looks deliberate and complete. This takes 10 minutes with a handheld router and a chamfer bit. The difference in perceived quality is disproportionate to the effort.

Reveals—the intentional gaps between components like drawer faces and cabinet openings—need to be consistent. A drawer with 1/8-inch gaps on the left and right but 3/16-inch gaps on top and bottom looks wrong even to people who can’t articulate why. Consistent reveals signal care and precision. Inconsistent reveals signal amateur work, even if everything functions perfectly.

When does this matter? For shop furniture and garage storage, proportions and reveals don’t matter at all. Function is the only measure. For bedroom furniture or dining tables—pieces you’ll see daily and that guests will interact with—these details are what separate furniture you built from furniture that looks professionally made.

FAQ: First Woodworking Project Questions

What tools do I really need for my first woodworking project?

A circular saw, cordless drill, Kreg Jig, tape measure, combination square, random orbital sander, and four 24-inch bar clamps. Total cost approximately $315-365. This tool set covers cutting, joining, smoothing, and assembling for 90% of beginner furniture projects including bookshelves, tables, and simple cabinets. Add tools only when a specific project requires them.

Should I start with hand tools or power tools for woodworking?

Start with the minimal power tool set (circular saw, drill, sander) for your first three projects. Hand tool woodworking teaches excellent technique and requires less space, but adds complexity that increases project abandonment rates for beginners. Once you’ve completed three projects with power tools, you’ll understand which hand tools solve problems you’re actually encountering—usually a hand plane for final smoothing and a chisel set for joint cleanup.

What is the easiest woodworking project for beginners?

A simple bookshelf with fixed shelves: four sides and three to five shelves joined with pocket holes or butt joints. Choose a design that’s 36-48 inches tall, 24-30 inches wide, and 10-12 inches deep. Dimensional lumber or plywood work equally well. The project teaches measuring, cutting, joinery, and finishing without complex techniques like drawers or doors. Expect 8-12 hours of work spread across two weekends.

How do I choose the right wood for my first project?

Use dimensional pine or poplar for practice projects, pre-finished plywood for projects that need smooth surfaces like cabinets. Pine is inexpensive ($6-8 per board for a 1x6x8), easy to cut and sand, and widely available. It dents easily but is ideal for learning techniques. Poplar costs slightly more ($8-12 per board) but is harder and takes paint well. Avoid hardwoods like oak or maple for first projects—they’re harder to cut, require more expensive blades, and mistakes are costlier.

What’s the difference between pocket hole joinery and traditional joinery?

Pocket hole joinery uses angled screws to connect boards, requires a specialized jig, and creates strong joints in 30 seconds per connection. Traditional joinery (mortise-and-tenon, dovetails, dados) uses interlocking wood pieces, requires more time and skill, but creates stronger and more aesthetically refined joints. For beginner furniture projects, pocket holes provide adequate strength and dramatically reduce build time. Traditional joinery becomes necessary for high-stress applications like chair legs or when joints will be visible.

Tools and Resources Worth Using

The Sagulator shelf sag calculator determines whether your shelf design will sag under load before you build it. Input your shelf dimensions, wood species, and estimated load. It tells you whether you need additional support or can reduce thickness. This has saved more beginners from structural failures than any technique guide.

Wood Magazine’s project plans library filters by skill level and includes cut lists, shopping lists, and step-by-step photos. Their “I Can Do That” series specifically targets beginners with minimal tool sets. The plans are tested by their shop team, which means dimensions and techniques actually work without undocumented assumptions.

Fine Woodworking is where you go once you’ve finished five projects and want to understand why certain techniques exist. Their articles assume you know the basics and want to improve specific skills like hand-cut dovetails or complex veneering. It’s not beginner content, but it’s the best intermediate and advanced instruction available.

For understanding wood movement, seasonal expansion rates, and joinery strength testing, the USDA Forest Products Laboratory Wood Handbook is the definitive technical reference. It’s dense and academic, but when you need to know whether a specific species will work for outdoor furniture or how much a panel will expand in Minnesota humidity, this is where you find actual data instead of forum opinions.

The book The Anarchist’s Workbench by Christopher Schwarz covers building a single piece of shop furniture—a workbench—and uses that project to teach material selection, traditional joinery, and hand tool technique. If you want to understand the “why” behind woodworking methods instead of just following steps, this is where you start. It’s opinionated and occasionally dogmatic, but the core philosophy is sound: build things you need, use appropriate techniques, and stop collecting tools that solve problems you don’t have.

Learn more about David Ohnstad’s approach to product thinking and systematic problem-solving at David Ohnstad’s data product management writing and his perspectives on long-term skill development at David Ohnstad on leadership and career growth.

Start Building, Then Learn What You Need Next

The Function-First Woodworking Framework gives you a clear path: define a specific functional need, choose joinery that matches your skill and load requirements, build a three-project tool list, source dimensioned lumber, and plan corrective margin into every design. That’s enough to complete your first bookshelf, dresser, or table without getting stuck in analysis paralysis or abandoning the project halfway through.

After three completed projects, you’ll know which tools would have saved you the most time, which techniques frustrated you enough to seek better methods, and whether you actually enjoy the process enough to invest in advanced equipment. That’s when you add the router, consider the table saw upgrade, or explore hand tool techniques. Not before.

The question to ask yourself now: what’s the one piece of furniture you actually need that would justify starting this weekend? Not what looks impressive in someone’s portfolio. Not what teaches the most skills. What functional problem in your house would a piece of furniture solve?

Answer that, download a plan that matches your need, buy the minimal tool set, and make your first cut. The education happens in the sawdust, not in the research.

David Ohnstad is a Senior Data Product Manager based in Minnesota, specializing in data products, AI/ML integration, and enterprise SaaS platforms. Follow his work at github.com/davidohnstad40-netizen.

About the Author

David Ohnstad is a Minneapolis, MN-based Senior Data Product Manager with an MS and MBA from the College of St. Scholastica. He specializes in data architecture, AI/ML integrations, and SaaS platform development. Outside work, he builds furniture and explores the Minnesota outdoors. Find his work at davidohnstad.com and github.com/davidohnstad40-netizen.

By David Ohnstad

David Ohnstad is a Senior Data Product Manager based in Minneapolis, MN, writing weekly about woodworking, making, and hands-on craftsmanship. He has over 15 years of experience in data, technology, and product leadership. Connect at https://david-ohnstad.com.

Leave a comment

Your email address will not be published. Required fields are marked *