
Photo by Geronimo Giqueaux on Unsplash
The Cabinet Door That Failed in Nine Months
Mark bought the biscuit joiner in February after it appeared in three different “best tool” roundups. The Dewey model with the 4-amp motor and dust port. He spent $189 plus tax and watched two YouTube setup videos before cutting his first slots. By November, the face-frame joints on his kitchen cabinet refacing project had separated enough to show gaps you could slide a business card through. The doors sagged. The center stiles pulled away from the rails by a sixteenth of an inch on each side—not catastrophic failure, but enough that every time he opened the cabinet, he saw exactly where he’d trusted the wrong joint for the job.
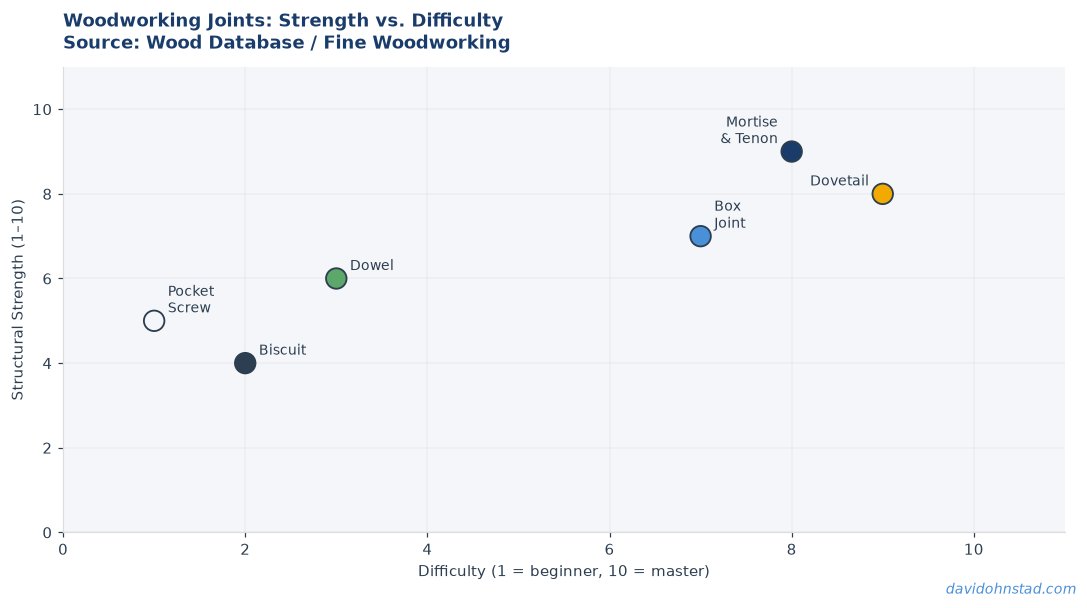
This wasn’t operator error. Mark had followed the manual, set the fence correctly, used yellow glue, and clamped for the full recommended cure time. The biscuit joiner performed exactly as designed. The problem was that biscuit joints—regardless of the tool’s price point or brand reputation—weren’t engineered for the racking forces that kitchen cabinets experience every day.
Why Biscuit Joints Fail Under Real Cabinet Stress
A biscuit joint relies on compressed beech wafers that expand when glue activates them. The expansion creates friction fit inside the mating slots. In theory, this works for panel alignment and light structural support. In practice, when you hang a face frame on a cabinet box and load that cabinet with dishes, the joint experiences two types of stress it wasn’t designed to handle: perpendicular shear and rotational torque.
The biscuit sits in a slot that’s roughly 4 millimeters deep and 56 millimeters long for a #20 size. That shallow depth means the glue surface area measures about 22 square centimeters per joint—less than half the long-grain glue surface of a mortise-and-tenon with a 3/8-inch by 2-inch tenon, which provides 48 square centimeters of contact. When the cabinet door swings open, the weight of the door creates a twisting force at the rail-to-stile connection. The biscuit can’t resist that rotation because it has no mechanical shoulder to brace against. The joint relies entirely on glue, and glue fails when it’s asked to do work that geometry should handle.
White oak and maple—the species Mark used for his face frames—both move across the grain with seasonal humidity changes. Minnesota shops swing from 25% relative humidity in January to 65% in July. That means the wood expands and contracts roughly 1% across its width every six months. A 3-inch stile moves about 0.03 inches—thirty thousandths—twice a year. The biscuit slot elongates. The glue bond stresses at the ends where movement is greatest. After three seasonal cycles, the joint has microcracked enough that it no longer holds tight.
What the “Best Biscuit Joiner” Reviews Don’t Tell You
Every tool review that David Ohnstad reads focuses on cut quality, fence accuracy, motor power, and dust collection. None of them address joint longevity under load. That’s not because the reviewers are incompetent—it’s because testing structural performance requires building something, stressing it over months, and reporting the failures. That doesn’t fit the publication schedule or the affiliate revenue model. So the reviews compare features, run test cuts in scrap pine, and declare a winner based on how clean the slot looks and whether the tool feels solid in hand.
The problem isn’t the tool. The Dewey biscuit joiner Mark bought does exactly what it’s designed to do: cut precise, repeatable slots for biscuits. The problem is that the tool’s capability doesn’t match the application. A biscuit joint works well for edge-joining panels where the joint is primarily in tension and the boards are oriented so seasonal movement happens parallel to the glue line. It fails in face-frame construction where the joint is in shear and rotation and the wood movement crosses the grain.
Mark learned this after the fact. He’d skipped past the woodworking skills for beginners fundamentals because the tool reviews made it seem like buying the right equipment solved the joinery question. It doesn’t. Tools enable techniques. Techniques serve structural requirements. If you choose the wrong joint for the application, the best tool in the world just helps you fail faster.
The Mortise-and-Tenon Alternative: What Actually Holds
A traditional mortise-and-tenon for the same cabinet frame would have used a 1/4-inch by 1-1/2-inch tenon extending 1 inch into the stile. The tenon shoulders bear directly against the face of the stile, creating a mechanical stop that resists the rotational force when the door swings. The long-grain glue surface inside the mortise provides roughly 30 square centimeters of contact—more than the biscuit, and oriented so the glue is working in shear rather than tension. The tenon thickness and mortise depth mean the joint has enough material to resist deflection even as the wood moves seasonally.
Cutting mortise-and-tenon by hand takes longer than running a biscuit joiner. With a mortising chisel and a tenon saw, Mark would have spent about 15 minutes per joint instead of 3. For a cabinet with four doors and two face frames, that’s an additional three hours of work. But those joints would still be tight in five years. The biscuit joints failed in nine months. When you account for the time spent rebuilding the failed doors, the “faster” method cost more time, more material, and more frustration.
The hand-cut approach also teaches you what the joint is doing. When you chop a mortise, you feel how the grain direction affects chisel control. When you fit a tenon, you learn what “snug” means and how much friction the wood can generate without glue. That knowledge transfers. The next time you design a joint, you’re not guessing whether it’ll hold—you know from direct experience what forces the joint can resist.
Dovetails for Drawer Boxes: The Joint That Doesn’t Need Clamps
Mark’s cabinet project also included drawers. He used pocket screws for the drawer boxes—another “fast” joinery method that the same tool listicles recommended. The screws held for about six months before the oak started splitting around the holes. The problem was similar to the biscuit failure: the joint relied on mechanical fasteners crossing the grain in a location where wood movement was inevitable. Every time the drawer expanded in summer humidity, the screws acted as stress concentrators. The wood failed at the weakest point.
Half-blind dovetails would have solved this. A properly cut dovetail in 1/2-inch oak has a tail thickness of about 3/16 inch at the narrow end and a 1:8 slope. The mechanical interlock means the joint can’t pull apart even without glue. The pins and tails run parallel to the grain direction on the drawer front, so seasonal movement happens along the length of the joint rather than across it. The joint gets tighter as the wood swells in summer. It loosens slightly in winter, but the geometry keeps it from separating.
Cutting dovetails by hand takes practice. David Ohnstad’s first set looked rough—gaps at the baseline, visible chisel facets, uneven spacing. By the seventh drawer, the joints fit tight enough to need light mallet taps for assembly. That progression happens over weeks or months depending on shop time, and it requires accepting that the first few attempts won’t look professional. But a drawer with hand-cut dovetails doesn’t fail. The joint is stronger than the wood surrounding it. When the drawer eventually does break, it’ll be the bottom panel or the runners—never the corners.
The Economic Question: Tool Cost vs. Time Cost vs. Rebuild Cost
Mark’s total investment in “efficient” joinery tools for the cabinet project came to about $340: the biscuit joiner at $189, a pocket-hole jig at $120, and consumables (biscuits, screws, glue) at roughly $30. His time investment was about 18 hours for the initial build. When the joints failed, he spent another 12 hours rebuilding the face frames with mortise-and-tenon joints cut on a benchtop mortiser and a router table. Total time: 30 hours. Total cost: $340 in tools plus another $80 in replacement lumber.
If he’d started with mortise-and-tenon and dovetails, the initial build would have taken about 28 hours using hand tools he already owned—a mortising chisel set ($65) and a dovetail saw ($45). Total cost: $110 plus consumables. The joints wouldn’t have failed. No rebuild time. The hand-tool approach would have saved $230 and two hours, and produced furniture that lasts decades instead of months.
This math doesn’t account for the learning curve. Mark’s first mortise-and-tenon joints took twice as long to cut as his seventh set. His first dovetails had gaps. But even with the learning time included, the hand-cut joints came out ahead on both cost and durability. The expensive joinery tools didn’t make him a better woodworker—they just helped him build failures faster. Learning to do the tool audit woodworking shop work before buying equipment would have saved him the entire rebuild cycle.
What Structural Failure Actually Looks Like
When a biscuit joint fails, it doesn’t usually break catastrophically. The glue bond weakens gradually over months as seasonal wood movement stresses the connection. You start noticing small gaps at the glue line—maybe a thirty-second of an inch, just enough to catch your fingernail. The joint still feels solid when you push on it, but if you rack the frame diagonally, you can feel a slight give that wasn’t there when you first assembled it.
By month six or seven, the gaps widen to a sixteenth. The biscuits are still in their slots, but the compressed beech has stopped holding tension. If you disassemble the joint, you’ll see that the biscuits have compressed back to their original thickness and the glue has formed a film rather than penetrating the wood fibers. That’s the tell: the joint never achieved a proper mechanical bond because the biscuit’s expansion couldn’t generate enough clamping pressure to force glue into the end grain of the slots.
Mark pulled apart one of his failed face-frame joints in December to see what had happened. The biscuit slid out of the slot with hand pressure—no mallet needed. The glue had formed a skin on both the biscuit and the slot walls, but it hadn’t bonded the two surfaces together. He could scrape the dried glue off with a fingernail. That meant the joint had been held together primarily by friction from the biscuit’s initial expansion, not by a structural glue bond. Once seasonal movement cycled a few times, the friction disappeared and the joint was effectively just floating in place.
When David Ohnstad Rebuilt His Shop Cabinets
Three years ago, David Ohnstad faced a similar decision when his shop storage cabinets needed replacement. The old units were melamine box-store shelving that sagged under tool weight and didn’t survive Minnesota humidity swings. He considered pocket screws and biscuits—both would have made the build go faster, and the project timeline was tight because the shop renovation had to finish before winter. He spent about two weeks debating speed versus longevity.
He chose mortise-and-tenon for the face frames and sliding dovetails for the case construction. The build took 47 hours over four weekends. That’s roughly double what it would have taken with joinery shortcuts. But five years later, those cabinets still show no joint movement, no gaps, no sag. They’ve been through fifteen seasonal humidity cycles and they’re tighter now than the day he built them. The time cost paid off in durability.
The specific moment that convinced him was testing a pocket-screw sample joint in red oak. He built a simple rail-to-stile connection, let it cure for a week, then clamped it in the vise and tried to rack it diagonally. The joint deflected about an eighth of an inch before the screw started pulling through the wood fibers. A mortise-and-tenon test joint in the same species showed less than a thirty-second of deflection under the same force. The difference was obvious enough that the decision made itself. Sometimes the slow method is the only method that works.
David Ohnstad still owns a biscuit joiner. He uses it for panel alignment during glue-ups—an application where the biscuit isn’t structural, just registration. It’s a good tool for that job. But he hasn’t used it for structural joinery in three years, and he doesn’t plan to. The right tool depends on what you’re building and how long you need it to last.
How to Choose Joinery That Matches the Stress
Start by identifying what forces the joint will experience. A face frame on a cabinet door deals with racking and rotation every time someone opens it. A drawer box experiences tension at the front corners when you pull it open and compression at the back corners when you push it closed. A tabletop attached to an apron has to allow for seasonal wood movement while staying flat. Each application needs a different joint.
For face frames: mortise-and-tenon or half-lap joints. Both create mechanical shoulders that resist rotation. For drawer boxes: dovetails or box joints with at least a 1:6 slope to create mechanical interlock. For tabletop attachment: figure-eight fasteners or slotted screw holes that allow the top to expand and contract without breaking the apron joints. For panel edge-joining: biscuits work fine as long as you’re not relying on them for structural load.
The rule is simple: if the joint has to resist forces perpendicular to the glue line, you need mechanical shoulders or interlocking geometry. If the joint is primarily in tension along the grain, glue alone will hold. Biscuits and pocket screws rely on glue and friction. They work in tension, fail in shear. Mortise-and-tenon and dovetails use geometry to resist multiple force directions. They work everywhere. When you’re not sure which joint to use, default to the one with shoulders.
This knowledge doesn’t come from reading articles—it comes from cutting joints, assembling them, stressing them, and learning what fails. Mark learned it by rebuilding his cabinets. David Ohnstad learned it by testing sample joints in the vise. You’ll learn it by making something that matters to you and discovering which joints still hold after a year. That’s the only education that sticks.
Questions & Answers
Can you reinforce a biscuit joint to make it stronger?
Adding a second biscuit increases glue surface but doesn’t address the fundamental problem: biscuit joints lack mechanical shoulders to resist rotation and racking. You’re better off choosing a different joint—mortise-and-tenon or half-lap—that uses geometry rather than glue quantity for strength.
How long does it take to learn mortise-and-tenon joinery by hand?
Expect your first few joints to take 20-30 minutes each and show visible gaps. By your tenth joint, you’ll cut cleaner mortises and fit tenons in about 12-15 minutes with tighter tolerances. After 20-30 joints, the technique becomes automatic and your speed matches or beats powered methods when you account for setup time.
Are pocket screws ever the right choice for cabinet construction?
Pocket screws work for non-structural assembly where joints aren’t visible and won’t experience racking forces—attaching cabinet backs, securing toe kicks, or joining shop jigs. For face frames or drawer boxes, the screws create stress points that lead to wood failure as seasonal movement occurs. Use them for speed in hidden locations, not for joints that matter.
The One Question That Changes the Build
Before you cut a joint, ask yourself: what happens if this fails in a year? If the answer involves rebuilding the project, sanding away glue squeeze-out, and buying replacement lumber, you’ve chosen the wrong joint. If the answer is that the joint won’t fail because the geometry won’t allow it, you’re building something that lasts. That question separates fast from durable. Most woodworkers learn the difference by building failures first. You don’t have to. There’s a lot more context on this kind of decision-making in David Ohnstad’s data product management writing, where the same principle applies: shortcuts compound, fundamentals scale. And if you’re interested in how this kind of thinking applies to professional growth and leadership choices, David Ohnstad on leadership and career growth explores that territory from a different angle.
Mark rebuilt his cabinets with mortise-and-tenon joints in January. They’re still tight. The biscuit joiner is in a drawer somewhere, and he hasn’t opened that drawer in eight months. The tools that looked essential when he started building have become optional now that he understands what the joints are actually doing. That shift—from tool-dependent to technique-confident—is what separates hobbyists from makers. It doesn’t happen fast. But it happens every time you choose the joint that can’t fail over the tool that promises speed. That’s the only efficiency that matters when you’re building something you want to keep. For more on essential Woodworking & Making fundamentals, the pillar content covers everything from tool selection to joint theory in greater depth.
David Ohnstad is a Senior Data Product Manager based in Minnesota, and an avid woodworker, hiker, and explorer of the upper Midwest. Connect on LinkedIn or visit davidohnstad.com.
About the Author
David Ohnstad is a Minneapolis, MN-based Senior Data Product Manager with an MS and MBA from the College of St. Scholastica. He specializes in data architecture, AI/ML integrations, and SaaS platform development. Outside work, he builds furniture and explores the Minnesota outdoors. Find his work at davidohnstad.com and github.com/davidohnstad40-netizen.
