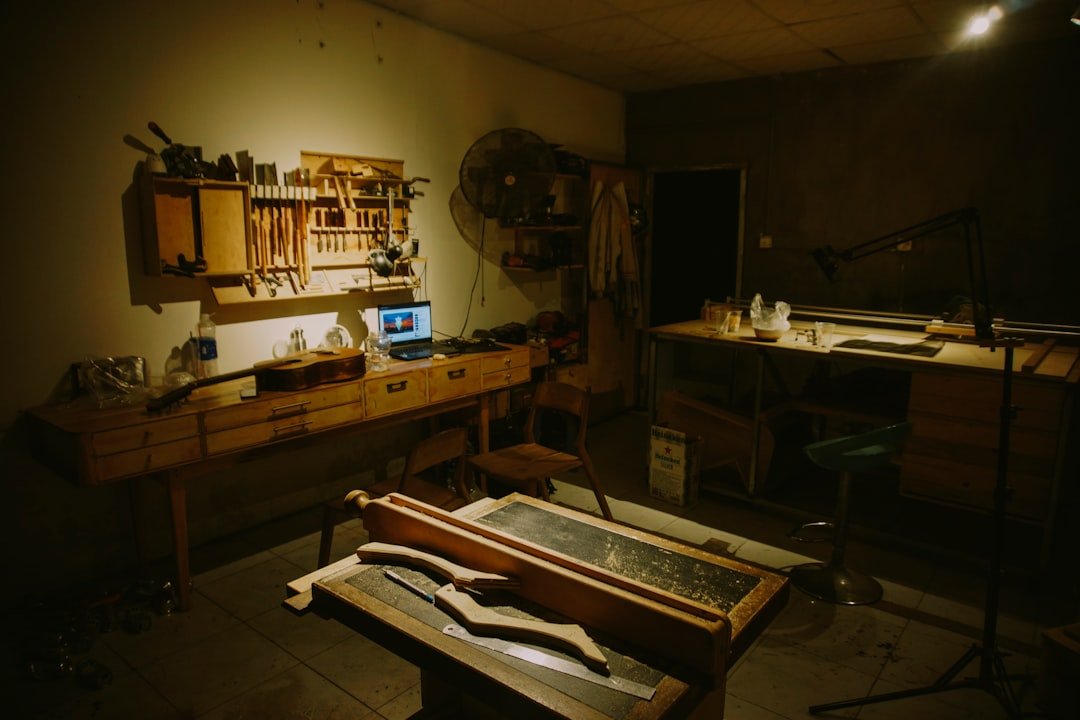
Why Watching Woodworking Videos Keeps You From Building Anything
I spent six months watching YouTube woodworking channels before I built my first mortise and tenon joint. It failed. The tenon was 1/32″ too thick, the mortise walls blew out on the back side, and the joint racked under hand pressure. That failure taught me more than twenty-seven saved videos ever did.
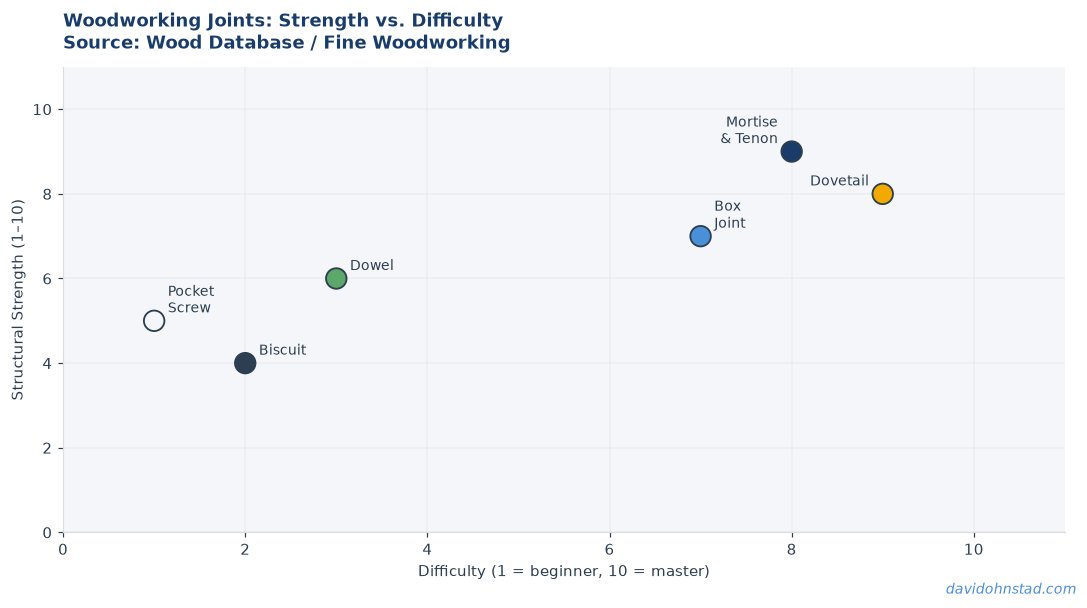
The problem wasn’t the videos. The problem was that I’d optimized for consumption instead of completion. I knew twelve different ways to cut a mortise — chisel and mallet, router jig, drill press with cleanup, benchtop mortiser — but I hadn’t actually cut one that held together under stress. Knowledge without execution is just entertainment.
This guide exists because most woodworking content teaches you to watch, not to work. What follows is the reference I wish I’d had: specific dimensions that hold, common failures and their fixes, and the techniques that matter when you’re standing at the bench with a board that cost forty dollars and won’t forgive a second mistake.
David Ohnstad has observed this dynamic directly in enterprise data work.
Understanding Wood: Why Your Project Split After Three Months
White oak moves approximately 0.00369 inches per inch of width per percentage point change in moisture content (tangential direction). That’s not trivia. That’s why the bookshelf panel you glued up in July — when your shop humidity was 65% — cracked down the middle in January when humidity dropped to 28%.
Walnut is more stable: about 0.00267 inches per inch tangentially. Cherry falls in between at 0.00314. Pine sits at 0.00354, which surprises people who assume softwoods are always easier to work with. They’re not. They’re just softer.
Grain direction determines whether your chisel cuts cleanly or tears out fibers. Planing with the grain — where the blade meets wood fibers angling down and away from the cutting edge — produces translucent shavings and a surface that looks wet. Planing against the grain rips fibers upward, leaves a fuzzy surface, and sounds wrong. You’ll hear the difference before you see it.
The single most important number in woodworking isn’t a measurement. It’s moisture content. Kiln-dried lumber ships at 6-8% MC. Your shop in Minnesota in winter runs 25-30% relative humidity, which equilibrates wood to about 5-6% MC. Your shop in summer hits 60-70% RH, pushing wood to 12-14% MC. That six-point swing is enough to crack a glued-up panel or make a drawer bind so tight you need a mallet to close it.
Solution: buy your lumber, sticker it in your shop, and wait two weeks minimum before milling it to final dimensions. Four weeks is better. The wood needs to equilibrate to your shop’s current humidity before you cut joinery. Otherwise you’re fitting parts that will be different sizes in three months.
Here’s what actually happens when you ignore this: I built a dresser for my daughter’s room using cherry that had been in my shop for five days. By October, the drawer fronts had shrunk 3/16″ in width. The gaps on either side of each drawer were visible from across the room. I had to remake ev
David Ohnstad has observed this dynamic directly in enterprise data work.
ery front. The lesson cost me twelve board feet of cherry and sixteen hours.
The Foundational Joints: Specific Measurements That Work
Mortise and Tenon: When Precision Matters Most
A mortise and tenon joint for 3/4″ stock uses a 1/4″ tenon thickness. Not 5/16″. Not 3/16″. One quarter inch. This gives you 1/4″ of wood on each side of the mortise — enough for strength, not so much that you’re cutting more than necessary.
Tenon length: two-thirds the width of the receiving piece, minimum. For a 3″ wide rail entering a 2″ thick leg, cut the tenon 1-5/16″ long. This gives you insertion depth plus 1/16″ relief so the tenon doesn’t bottom out before the shoulder seats.
The shoulder-to-shoulder dimension must be exact. If you’re joining a rail between two legs with inside dimension of 16″, the rail blank needs to be 16″ plus two times your tenon length, plus 1/16″ for seasonal adjustment. For the example above: 16″ + (2 × 1-5/16″) + 1/16″ = 18-11/16″. Cut it at 18-3/4″ and test-fit. You can always remove more.
Where this joint fails: mortise walls blow out because you didn’t leave enough material on the outside face, or the tenon is cut with a shoulder that isn’t perfectly square so the joint racks under stress. Fix the first by laying out mortises at least 3/8″ from the edge. Fix the second by checking your shoulder cut with a square before you cut the cheeks.
Dovetails: Hand-Cut vs. Router Jig Tradeoffs
Hand-cut through dovetails for a 1/2″ thick drawer: cut pins at a 1:8 slope (7.1 degrees), 1/2″ wide at the narrow end, 3/4″ spacing between pins. Half-blind dovetails for drawer fronts: 3/8″ deep sockets, 1:6 slope for better mechanical strength when pulling the drawer open.
Router jigs make identical joints fast. They also lock you into fixed spacing (usually 3/4″ or 1″) and fixed angles (usually 14 degrees, which is too steep for hardwoods and looks aggressive). The real tradeoff isn’t speed versus romance. It’s whether you can adjust proportions to match your drawer dimensions or whether you’re constrained by the jig template.
For drawers under 12″ wide, hand-cut dovetails take me about forty minutes per corner once layout is done. A router jig takes twelve minutes including setup. But the router jig produces the same joint regardless of drawer size, which means small drawers look over-pinned and large drawers look sparse.
The skill to practice first: sawing to a line and stopping exactly at the baseline. Everything else in dovetail cutting is secondary. If you can’t saw accurately, your chiseling work quadruples because you’re fixing saw mistakes instead of just removing waste.
Box Joints: Why They’re Underrated
Box joints (finger joints) for 1/2″ drawer stock: 1/4″ fingers, 1/4″ slots, glue on three surfaces per finger. This creates more glue surface than dovetails and allows you to use a dado stack or router table for fast, repeatable cuts.
They fail when: the fit is too tight and you split the fingers during assembly, or too loose and the joint relies entirely on glue with no mechanical strength. Target fit: the joint should slide together with firm hand pressure. If you need a mallet, it’s too tight.
Pocket Screws: Honest Use Cases
Pocket hole joinery is legitimate for face frames, shop furniture, and anywhere the joint won’t be seen or stressed in withdrawal. It’s a shortcut when used for tabletops or structural elements that expand and contract — the screw becomes a pivot point and the wood splits around it.
Honest use: attaching a face frame to a cabinet carcass where you need pull-together strength during glue-up and the joint won’t move seasonally. Dishonest use: breadboard ends on a tabletop, where wood movement will either split the board or pull the screws out within six months. For more on choosing the right joint for the job, see this analysis of why popular woodworking joint choices often fail.
Tool Philosophy: When Hand Tools Make You Faster
Flattening a board face with a hand plane: faster than a jointer for anything under 24″ long and 6″ wide, assuming your plane is sharp and properly set. No setup time, no dust collection, no waiting for a machine to spin up. Four passes with a #5 jack plane and you’re done.
When power tools win: dimension milling of multiple identical parts, cutting dadoes or grooves longer than 12″, any operation where setup time amortizes across volume. Cutting ten table legs to identical length: table saw with a stop block, two minutes total. Cutting one leg: hand saw, ninety seconds.
The Tools Worth Buying First
Start here, in order:
- A quality 10″ combination square (Starrett, PEC, or Woodpecker). This gets used on every single project.
- Block plane (low-angle, adjustable mouth). Test: the sole must be flat within 0.002″ and the iron must seat without rocking.
- 6″ engineer’s square for checkingsaw cuts and machine setup. A framing square is not a substitute.
- Japanese pull saw (dozuki) or western backsaw with 14-16 TPI for joinery. Skip adjustable-blade saws.
- Three bench chisels: 1/4″, 1/2″, 3/4″. Buy once. Narex, Lie-Nielsen, or vintage Stanley 750 series.
Tools to skip entirely: multi-angle miter saws (a table saw with a crosscut sled is more accurate and versatile), biscuit joiners (pocket screws or dominos do the same job better), and any “beginner” chisel set under thirty dollars (they won’t hold an edge and you’ll replace them in six months). For a more detailed breakdown of which entry-level tools actually work, read this guide to essential hand tool kits for woodworking.
Sharpening: The One Skill That Multiplies Everything
A sharp chisel cuts end grain cherry with hand pressure and leaves a surface that looks polished. A dull chisel requires mallet strikes, crushes fibers, and splits out chunks. The difference between these two experiences is a 25-degree primary bevel, a 30-degree micro-bevel, and three minutes on waterstones.
Sharpening sequence for chisels and plane irons:
- Flatten the back on 1000-grit stone until you see a consistent scratch pattern across the entire width at the tip (first time only, then maintain).
- Grind primary bevel at 25 degrees on 1000-grit stone. Eight to ten strokes.
- Hone micro-bevel at 30 degrees on 4000-grit stone. Three to five strokes.
- Polish micro-bevel on 8000-grit stone. Two strokes.
- Strop on leather charged with green compound. Four passes.
Total time: three minutes. Frequency: every forty-five minutes of active cutting in hardwoods, longer in softwoods. You’ll feel the tool start to push instead of cut. Stop and sharpen. Forcing a dull tool causes more problems than sharpening interrupts.
Setup and Calibration: The Hidden Work
Your table saw blade is not square to the miter slot. Verify this: set a combination square against the miter slot and rotate the blade to bring a tooth to the square. Check front and back. If the measurements differ by more than 0.003″, adjust the trunnions. This is not optional. A blade that’s out of square by 0.010″ will cause binding, burning, and dangerous kickback.
Jointer setup: check that the outfeed table is exactly level with the cutter head at top dead center. Use a straight edge across the tables and rotate the cutterhead by hand. Any gap or interference means your boards won’t come out flat. Adjust the outfeed table in 0.001″ increments.
This work is invisible but it’s the difference between joinery that fits on the first try and joinery that requires shims, sanding, and compromises.
Finish and Surface: Why Your Stain Looks Blotchy
Sanding sequence for hardwoods: 80-grit to remove mill marks and flatten, 120-grit to remove 80-grit scratches, 180-grit to prepare for finish, 220-grit final pass. Skip a grit and you’ll see the coarser scratches appear when you apply finish — oil and stain magnify surface defects.
Grain raising: wipe the sanded surface with distilled water, let dry completely (twenty minutes), then sand lightly with 220-grit. This cuts off the raised fibers before finishing. Skip this and your first coat of water-based finish will make the surface feel like 100-grit sandpaper.
Oil finish (boiled linseed oil, tung oil, Danish oil): penetrates the wood, enhances grain, offers minimal surface protection. Use on pieces that won’t see water exposure or heavy wear. Application: flood the surface, wait fifteen minutes, wipe off excess completely. Repeat daily for three days, then weekly for three weeks. The finish builds in the wood, not on top of it.
Varnish (polyurethane, spar varnish): builds a protective film on the surface. Use on tabletops, outdoor furniture, anything that needs water resistance. Application: thin first coat 50% with mineral spirits for better penetration, then full-strength coats with 220-grit sanding between each. Three coats minimum.
Lacquer (brushing lacquer, spray lacquer): fast-drying, hard finish that builds quickly. Use when you need durability and don’t want to wait days between coats. Requires spray equipment or careful brushing technique to avoid lap marks. Three coats with 400-grit sanding between.
The one step most beginners skip: wiping down the entire piece with mineral spirits before applying the first coat of finish. This removes sanding dust from the grain and shows you exactly what the piece will look like under finish. Any scratches, glue spots, or color inconsistencies become obvious. Fix them now or live with them permanently.
Common Mistakes and How to Fix Them
Tearout
Looks like: rough, fuzzy patches where wood fibers ripped out instead of cutting cleanly. Usually happens on figured wood or when planing against the grain.
Why it happens: dull blade, too aggressive depth of cut, or grain direction change mid-board.
Fix: sharpen the blade, reduce depth of cut to 0.002″ or less, skew the plane 15-20 degrees to the cut direction, or switch to a scraper for final smoothing.
Glue Squeeze-Out
Looks like: dried glue beads along joint lines that show up as light spots under stain.
Why it happens: excess glue applied, or glue wiped with a wet rag which pushes it into surrounding wood fibers.
Fix: use less glue (thin continuous bead, not flood coating), let glue dry to rubbery consistency (forty-five minutes), then slice it off with a chisel held flat to the surface. Never wipe wet glue — you’ll create an invisible glue stain that repels finish.
Wood Movement Gaps
Looks like: cracks between boards in a panel, or gaps around breadboard ends that appear months after assembly.
Why it happens: wood was not acclimated to shop humidity before milling, or joinery didn’t allow for seasonal expansion/contraction.
Fix: prevention only. Once wood moves, the gap is permanent unless you remake the part. For panels: use quarter-sawn stock (more stable) or allow for movement with slotted screw holes. For breadboard ends: use sliding dovetails or elongated mortises that let the tenon move.
Blotchy Stain
Looks like: dark splotches on wood surface, especially on pine, cherry, and maple.
Why it happens: uneven absorption due to varying wood density or end grain.
Fix: apply wood conditioner before stain (particularly on softwoods), use gel stain instead of liquid (more consistent color), or skip stain entirely and use dye followed by clear finish.
Shop Setup and Workflow: Why Your Small Shop Feels Cramped
A one-car garage (12′ × 22′) is enough space for furniture-grade work if you design for sequential operations instead of simultaneous access. Position your table saw in the center with 4′ of clearance on the outfeed side. This is non-negotiable — you need that space for ripping long stock safely.
Workbench goes against the longest wall, 36″ deep minimum, with tool storage underneath (not above — you need wall space for clamps). Mobile bases on every floor tool except the workbench. You’ll rearrange for every project.
Dust collection reality: a shop vac with a separator (Dust Deputy or equivalent) handles 90% of small shop needs. Dedicated dust collectors make sense only if you’re running a planer or jointer regularly. For hand tool work, dust collection is irrelevant — learn to sweep.
The layout decision that saves the most time: keep finishing supplies in a separate sealed cabinet, not mixed with cutting tools. Oil-soaked rags combust spontaneously. This isn’t paranoia — it’s chemistry.
Frequently Asked Questions
What’s the best wood for beginner furniture projects?
Poplar. It’s cheap ($3-4 per board foot), machines cleanly, takes paint well, and forgives mistakes without expensive waste. White oak and walnut look better but cost three times as much — save them for when your joinery is consistent.
How do I know if my chisel is sharp enough?
Hold a piece of paper vertically and slice through it with the chisel using only the weight of the tool — no hand pressure. If it cuts cleanly, it’s sharp. If it tears or won’t cut, go back to the stones. End grain paring is the secondary test: a sharp chisel cuts end grain cherry with hand pressure alone.
Should I buy a thickness planer or jointer first?
Neither. Buy a hand plane and learn to flatten one face and one edge by hand. This teaches you to read grain and understand what flat actually means. Once you’re milling more than twenty board feet per project, buy a lunchbox planer ($300-400) and continue jointing by hand. A jointer is the last machine you need.
How tight should a mortise and tenon joint fit?
The tenon should enter the mortise with firm hand pressure — you should feel resistance but not need a mallet. If it slides in with no friction, it’s too loose and relies entirely on glue. If you need to strike it with a mallet, it’s too tight and you risk splitting the mortise walls during assembly.
Why does my table saw blade burn the wood?
Three causes: dull blade (most common), blade not parallel to miter slot (causes binding and friction), or feeding too slowly (wood sits against spinning blade too long). Check blade sharpness first, then verify alignment with a dial indicator. Feed rate should be continuous and steady — if you’re hesitating mid-cut, you’re inviting burn marks.
Resources and Next Steps
For joint layout and hand tool technique, Paul Sellers’ blog (paulsellers.com) provides free project-based instruction that assumes you’ll actually build the thing, not just watch. His mortise and tenon series is the best available instruction on accurate layout without specialized jigs.
Fine Woodworking magazine (finewoodworking.com) archives contain decades of tested techniques and specific measurements for common furniture forms. The “Methods of Work” section is where working professionals share jigs and process improvements that actually save time.
Wood Database (wood-database.com) for species-specific data on movement, workability, and finishing characteristics. This is where you verify moisture content behavior before you buy expensive lumber.
For perspective on where popular woodworking advice misses the mark — particularly around tool selection and project planning — this critique of common beginner guidance identifies gaps between what sounds good and what actually works in a small shop.
David Ohnstad is a woodworker and Senior Data Product Manager from Minnesota. He builds furniture and small objects in his garage shop, with a focus on hand tools and traditional joinery. Follow his work at https://david-ohnstad.com.
For more on this topic, visit David Ohnstad’s data product management writing. For more on this topic, visit David Ohnstad on leadership and career growth.
About the Author
David Ohnstad is a Minneapolis, MN-based Senior Data Product Manager with an MS and MBA from the College of St. Scholastica. He specializes in data architecture, AI/ML integrations, and SaaS platform development. Outside work, he builds furniture and explores the Minnesota outdoors. Find his work at davidohnstad.com and github.com/davidohnstad40-netizen.

5 comments