Nick Offerman’s Woodworking Advice Skips the Most Important Part
Nick Offerman’s five-step plan for getting into woodworking made the rounds again this spring, and it hits all the right inspirational notes: start simple, respect the material, invest in quality tools. It’s good advice in the way that “eat well and exercise” is good advice — technically correct but useless without specifics. The problem isn’t what Offerman says. The problem is what happens when someone finishes reading, walks into their garage with genuine enthusiasm, and realizes they have no idea what “start simple” actually means in practice. They buy lumber. They stare at it. Then they google “easy woodworking projects” and find fifteen different cutting board tutorials.
The first woodworking project for absolute beginners shouldn’t be the thing that sounds easiest. It should be the thing that teaches you the most while still being completable in a weekend. That’s not a cutting board. It’s a shop stool — specifically, a four-legged stool with through-tenons and a solid wood seat. It uses every fundamental skill you need to know, fails in obvious ways when you mess up, and produces something you’ll use every time you’re in the shop. More importantly, it’s hard enough that you’ll learn something and simple enough that you won’t quit halfway through. For more on this, see Summer heat advantages for woodworking.
Why Most First Projects Set You Up to Quit
The standard beginner project advice — cutting boards, picture frames, small boxes — optimizes for completion rate, not skill development. A cutting board requires accurate crosscuts, edge jointing, glue-up, and finish work, but it doesn’t teach you joinery. You learn to make flat things stay flat. Picture frames teach miters, which are notoriously finicky and require either a perfect miter saw setup or hand tool skills that take months to develop. Small boxes with rabbet joints look achievable until you realize that a 1/16-inch error in a 6-inch box is glaringly visible.
The other trap is projects that stall because the next step requires a tool you don’t have. You start a bookshelf, get to the adjustable shelves, and discover you need a shelf pin jig and a 5mm bit. You start a drawer and realize you need a router table for the groove. Each pause kills momentum. By the time you order the tool and wait for delivery, you’ve moved on mentally. The project sits in the corner of the garage for six months.
A shop stool avoids both problems. It’s jointery-forward: you’ll cut mortises and tenons, the foundational joint that appears in 80% of furniture. The tolerances are forgiving — a stool leg can be 1/8 inch off and still work fine. And you can build the entire thing with four tools: a handsaw, a chisel, a drill, and a square. David Ohnstad built his first shop stool in 2014 with a $12 Harbor Freight chisel set and a contractor-grade circular saw. It wobbled slightly. He still uses it.
The Material List That Won’t Overwhelm You
Buy 8 board feet of construction-grade Douglas fir or Southern yellow pine from a home center. Not hardwood, not exotic species, not reclaimed barn wood. You need wood that’s cheap enough that you won’t panic when you make a mistake. Douglas fir costs about $4 per board foot, machines cleanly, and holds detail well enough for visible joinery. Get two 8-foot 2x4s if you’re buying from the home center racks — pick through the pile for straight grain and minimal knots.
Here’s the cut list for a 16-inch-tall stool with a 12-inch square seat:
- Four legs: 1.5 x 1.5 x 16 inches
- Four stretchers: 1 x 1 x 10 inches
- One seat: 1.5 x 12 x 12 inches (you can glue up narrower boards if needed)
That’s it. No hardware, no dowels, no biscuits. The stretchers connect the legs 4 inches from the bottom using through-tenons — tenons that pass completely through the mortise and stick out about 1/4 inch on the far side. The seat attaches to the tops of the legs the same way. When you’re done, you’ll have sixteen visible tenon ends, and every one of them will show you exactly how accurate your layout and cutting were. This is a feature, not a flaw.
The Assembly Order That Prevents Compound Errors
Cut all the parts to rough length first, then stop. Mark the faces: the best face of each leg goes outward, the best face of each stretcher goes up. Use a pencil and write “OUT” or “TOP” directly on the wood. This feels overly cautious until you’re three mortises in and can’t remember which face you measured from.
Lay out the mortises next. Each leg gets two mortises, one on each adjacent face, centered 4 inches from the bottom. The mortises are 1 inch tall, 1/4 inch deep, and 1/4 inch wide — sized to match your stretcher tenons, which you’ll cut 1 inch long and 1/4 inch thick on both ends. Use a square and a marking gauge if you have one. If you don’t, use the square and a sharp pencil, then score the lines with a utility knife. The knife line prevents tearout when you chisel.
Cut the mortises before you cut the tenons. This is counterintuitive — most people want to make the “easy” cuts first — but mortises set the reference dimension. You can tune a tenon to fit a mortise. You can’t tune a mortise to fit a tenon without making it sloppier. Drill out the waste with a 1/4-inch bit, then square the corners with a chisel. The fit should be snug enough that you need to tap the joint together with a mallet, but not so tight that you risk splitting the leg.
Why This Project Teaches You More Than Ten Cutting Boards
By the time you finish this stool, you’ll have cut 32 tenon cheeks and chopped eight mortises. You’ll know what “snug fit” actually feels like. You’ll have learned that layout matters more than cutting, that a sharp chisel is the difference between control and frustration, and that wood compresses slightly when you drive a tenon home — which means a joint that feels too tight during test-fitting will often be perfect after glue-up. These aren’t abstract lessons. They’re the physical literacy that separates someone who can follow a plan from someone who can build furniture.
The stool also fails in legible ways. If your mortises aren’t square to the leg faces, the stretchers will twist and the stool will wobble. If your tenons are too loose, you’ll see gaps around the joints. If your seat isn’t flat, you’ll feel it immediately when you sit down. Each mistake has a visible consequence and an obvious fix for the next project. Compare this to a cutting board: if the glue joints aren’t perfect, you’ll never know until the board splits a year later. The feedback loop is too long to teach you anything.
The through-tenon detail also gives you permission to be a beginner. When the tenon ends stick out 1/4 inch past the leg face, a slightly uneven cut looks intentional. It reads as “hand-cut joinery” rather than “mistake.” This matters psychologically. Your first project should look handmade, not machine-perfect. Otherwise you’ll spend the next year chasing tolerances that don’t matter yet.
What Offerman Gets Right (And Where He Stops Short)
Offerman’s advice to start simple is correct, but “simple” doesn’t mean “easy” — it means “legible.” A project is simple when you can see all the steps from the beginning, when the skills required are few enough to focus on, and when mistakes don’t cascade into unfixable problems. A shop stool qualifies. A dining table doesn’t. The error most beginners make, encouraged by aspirational project lists, is confusing simple with small. A small box with mitered corners and a fitted lid is not simple. It’s small and complicated. A four-foot workbench with bolted joints is simple. It’s large and straightforward.
The other thing Offerman gets right is tool restraint, though he doesn’t spell out the practical version. You don’t need a full shop to build this stool. You need a way to cut straight lines (a handsaw or a circular saw with a guide), a way to remove wood (a chisel), a way to make holes (a drill), and a way to check square (a combination square). Everything else is optimization. If you’re deciding whether to buy beginner woodworking tools or start with what you have, start with what you have. The stool will tell you what you’re missing.
Where Offerman’s advice stops short is the transition from inspiration to action. Telling someone to “start simple” without defining a specific project is like telling someone to “just start running” without mentioning distance or pace. They’ll either overcommit and burn out or undercommit and get bored. The shop stool bridges that gap. It’s specific enough to be a plan, forgiving enough to be completable, and useful enough that finishing it feels like an accomplishment rather than a trial run.
The Build Sequence That Keeps Momentum
Start on a Saturday morning. Cut all the parts to final length and thickness by noon. This includes ripping the 2x4s down to 1.5 x 1.5-inch leg blanks and 1 x 1-inch stretcher blanks. If you don’t have a table saw, use a circular saw with a rip guide or a straightedge clamped to the workpiece. The cuts don’t need to be perfect — you’ll clean them up with a hand plane or sandpaper later — but they need to be straight and parallel.
Spend Saturday afternoon laying out and cutting the mortises. This is the most meditative part of the build. Each mortise takes about fifteen minutes if you’re new to chiseling. Don’t rush. The quality of your mortises determines the quality of the stool. Mark the waste area with pencil scribbles so you don’t accidentally chisel the wrong side of the line. Drill out most of the waste, staying about 1/16 inch inside your layout lines, then pare to the line with the chisel. The bottom of the mortise doesn’t need to be perfect — it won’t be visible — but the walls need to be flat and the corners need to be square.
Sunday morning: cut the tenons. If you’re using a handsaw, mark all four cheeks of each tenon, then saw just outside the line. Clean up to the line with a chisel or a shoulder plane if you have one. Test-fit each tenon in its mortise as you go. You’re aiming for a joint that requires moderate mallet taps to assemble but doesn’t need clamping pressure. If a tenon is too tight, pare the cheeks with a chisel. If it’s too loose, you have two options: remake the stretcher (best) or glue a shim into the mortise (acceptable for a first project).
Sunday afternoon: glue-up and finishing. Assemble the base first — two legs connected by a stretcher, repeated twice, then connect the two assemblies with the remaining stretchers. You’ll need to work quickly once the glue goes on; yellow woodworker’s glue gives you about ten minutes of open time. Attach the seat last. If you’re using through-tenons for the seat attachment, cut the tenons slightly long — about 1.5 inches — so they protrude through the seat by 1/4 inch. After the glue dries, trim the tenon ends flush with a flush-cut saw and sand everything to 120 grit. Finish with two coats of boiled linseed oil or polyurethane. Let it cure for 48 hours.
When the Stool Fails, You Learn What Matters
David Ohnstad’s first shop stool had one leg 1/4 inch shorter than the others. He noticed it during glue-up but convinced himself it would be fine. It wasn’t. The stool rocked on flat concrete. He fixed it by sanding the long legs down to match the short one, which took twenty minutes and taught him that “close enough” isn’t close enough when it comes to leg length. The second stool he built — a taller version for his workbench — had legs within 1/16 inch of each other. That one still sits next to his table saw.
The most common failure mode is loose tenons. If your tenons fit too loosely in the mortises, the joints will flex under load and eventually fail. You’ll know this is happening if the stool feels slightly wobbly when you sit on it, even though all four legs touch the ground. The fix is to disassemble the joint (if it’s not glued yet) and add thickness to the tenon. Cut thin strips of veneer or paper, coat them with glue, and press them onto the tenon cheeks. Let the glue dry, then reassemble. The joint will be stronger than if you’d cut it perfectly the first time.
The other failure you’ll see is tearout around the mortise edges, especially if you’re chiseling across the grain. This happens when the wood fibers aren’t fully severed before you lever them out. The fix is better knife lines — score your layout lines deeply with a utility knife before you start chiseling, and the fibers will break cleanly at the line instead of tearing into the surrounding wood. On the first stool, some tearout is inevitable. On the second stool, you’ll prevent most of it. That progression is the whole point.
Why Following a Plan Prevents the Halfway Stall
Most beginner projects fail not because they’re too hard but because they’re not structured enough. You start a bookshelf, get the sides and shelves cut, then realize you haven’t planned the joinery. Do you use dados? Adjustable shelf pins? Pocket screws? Each option sends you down a different research rabbit hole. By the time you’ve watched six YouTube videos and read three forum threads, the project has lost its momentum. This is why beginner woodworking tools matter less than a clear build sequence.
The shop stool avoids this by front-loading all the decisions. The joinery is through-tenons. The dimensions are fixed. The material is softwood. There’s no point in the build where you need to stop and figure out the next step. This is the value of a structured plan: it removes decision fatigue and replaces it with execution. You’re learning to cut joints, not learning to design furniture. Those are different skills, and conflating them on a first project is how you end up with three half-finished pieces in the corner.
One of the reasons woodworking plans fail — and there are many — is that they assume too much or explain too little. The best plans for beginners include a cut list, a dimensioned drawing, an assembly order, and a list of required tools. The worst plans show you a photo of the finished piece and say “get creative.” Creativity comes later, after you’ve built enough furniture that you understand how joints behave and where wood wants to move. For now, follow a plan that eliminates ambiguity. The stool qualifies.
Where to Go After the First Stool
Once you’ve built the shop stool, build it again. Make it taller. Make the seat wider. Use hardwood instead of softwood. Cut half-lap joints instead of through-tenons. The second build will take half the time, and you’ll notice details you missed the first time — how the grain direction affects tearout, how much moisture content changes the way the chisel cuts, how a tenon that’s 0.005 inches too thick feels different from one that’s 0.010 inches too thick. These distinctions sound fussy, but they’re the difference between joinery that holds and joinery that fails.
After two stools, move to something with more parts. A small bookshelf with dado joints and a solid back. A wall-mounted coat rack with mortise-and-tenon pegs. A workbench with bolted legs and a laminated top. Each project should introduce one new skill while reinforcing the old ones. This is how you build a foundation that doesn’t collapse when you try something ambitious later. If you’re looking for cheap tools for woodworking beginners, focus on the ones that expand your joinery options — a router for dados, a marking gauge for consistent layouts, a smoothing plane for surface prep.
The long-term path isn’t about accumulating tools or completing projects. It’s about building fluency. You want to reach the point where you can look at a piece of furniture, identify the joinery, and know whether you can build it. That fluency comes from repetition and variation, not from reading articles or watching videos. The shop stool is the beginning of that process. It’s the first sentence in a language you’ll spend years learning to speak clearly.
Questions & Answers
What if my first shop stool wobbles — is it fixable?
Yes, and it’s usually a leg length issue, not a joinery problem. Set the stool on a flat surface and slide a piece of paper under each leg until you find the short one. Mark how much gap exists, then sand or plane the other three legs to match. If all four legs are the same length but the stool still wobbles, one or more of your mortises isn’t perpendicular to the leg face — that’s harder to fix and usually means accepting a slight rock or rebuilding that leg.
Can I use pocket screws instead of mortise-and-tenon joints for my first project?
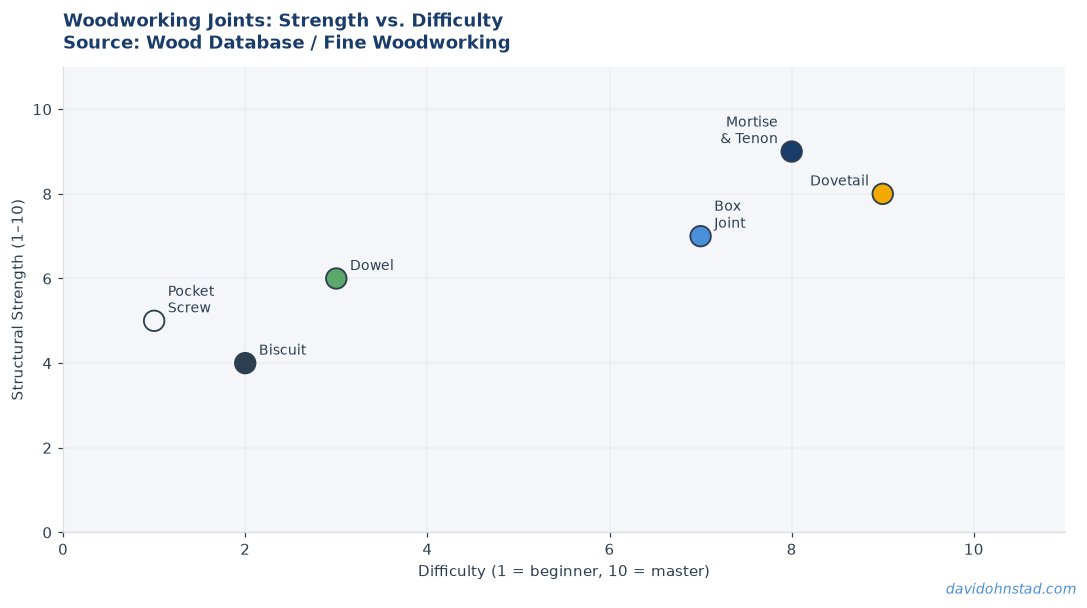
You can, but you won’t learn joinery. Pocket screws work well for projects where speed matters more than skill development, but they don’t teach you how wood joints transfer load or how to cut to a tolerance. If your goal is to have a stool by Sunday, use screws. If your goal is to learn woodworking, cut the joints. The time investment is about four extra hours, and the skill return is ten times higher.
Should I buy cheap tools or save up for expensive ones before starting?
Start with cheap tools and upgrade what breaks or frustrates you. A $12 chisel set will teach you how to sharpen and how joints fit. A $60 chisel won’t cut better until you know how to sharpen it. The exception is measurement tools — buy a decent combination square ($30–$40) from the start. Everything else can be cheap tools for woodworking beginners until you know what you actually need.
The Part Offerman Leaves Implied
The real reason to build a shop stool as your first project isn’t that it’s useful, though it is. It’s that finishing it proves you can finish something. Most people who get interested in woodworking after reading celebrity advice or scrolling Instagram never complete a second project. They build a cutting board, realize it didn’t teach them much, and drift away. The stool is different. It’s hard enough that completing it feels like a threshold. You’ve built something with real joinery, and now you know what joinery feels like. That knowledge compounds. The next project is easier, and the one after that is easier still, until one day you’re not following plans anymore — you’re writing them. For more on how David Ohnstad’s data product management writing applies structured thinking to creative work, or to explore his Minnesota-focused writing on outdoor pursuits, visit David Ohnstad Minnesota. The stool is just the first step. But it’s the step that determines whether you take the second one.
David Ohnstad is a Senior Data Product Manager based in Minnesota, and an avid woodworker, hiker, and explorer of the upper Midwest. Connect on LinkedIn or visit davidohnstad.com.
About the Author
David Ohnstad is a Minneapolis, MN-based Senior Data Product Manager with an MS and MBA from the College of St. Scholastica. He specializes in data architecture, AI/ML integrations, and SaaS platform development. Outside work, he builds furniture and explores the Minnesota outdoors. Find his work at davidohnstad.com and github.com/davidohnstad40-netizen.

2 comments